RSS Feed

Category Archives: Uncategorized

Soup-er Easy Cheesy Chicken Enchiladas

Posted on

I made this recipe for the first time last night and the family loved it. It was so filling we all kind of just sat there at the dinner table staring at each other afterwards moaning “Oh god it hurts to move…” Now, I fully admit, I stole the basis of the recipe from the back of a can of Campbell’s soup, however I looked at it and went “I can make that better.” So I did. The great thing about this recipe is that it uses Monterrey Jack cheese instead of cheddar, so you get cheesy, without the heavy grease. Also, I tend to cook with chicken quite often, and I noticed I had yet to post any recipes I use. So I figured it’s time to remedy that.

You will need:

2 c chicken broth

2 boneless, skinless chicken breasts

1 can Cream of Chicken soup

1/2 c sour cream

1 c picante sauce

2 tsp chili powder

1 tsp garlic powder

1 tsp onion powder

1 tsp coarse ground black pepper

1 lb shredded Monterrey Jack cheese

6 to 8 tortillas

2 small tomatoes, diced

1/2 c green onion, diced

1/4 purple onion, diced

a medium bowl

a large bowl

a medium pot

a 2qt baking dish

Get oven ready by heating it to 350 F.

The easiest and tastiest way I’ve found to cook chicken for dishes like this, is to boil it. But don’t just boil it in water, boil it in chicken broth. It adds a kick of extra flavor to the chicken. So first, take your two raw chicken breasts and cut off as much of the white fat and chewy bits as possible. You won’t want them in your enchiladas, I promise. Then boil them in the two cups of chicken broth until they’re white all the way through. Then set them aside to cool while you get the rest ready.

In the medium bowl, combine the soup, sour cream, picante sauce, and spices. Take roughly two thirds of the mixture and put it into the larger bowl. Add two thirds of your shredded Monterrey Jack cheese to the soup. Take your chicken and shred it. The easiest way to do this is to take two forks and while using one stabbed into the breast to hold it down, use the other to scrape the breast with the grain of the meat. That’s how you get those little stringy strips of chicken all throughout the enchilada, as opposed to big chunks. Add the chicken to the soup and cheese, as well as half your diced tomatoes, green onions, and purple onions, and mix well.

Now the original recipe called for flour tortillas, which is what I used, however this made the enchiladas very heavy. I have no idea how it would taste with corn tortillas, but when I do, I’ll let ya’ll know. Regardless of what tortillas you choose to use, you’ll need anywhere between 6 and 10 depending on how full you stuff them. I ended up using 8 tortillas, which worked perfectly for my baking pan. Place a scoop or two of the chicken mixture into the tortilla and roll it up, then place it in your baking dish which I suggest you spray down with Pam first. Continue until the pan is full, or you’re out of chicken filling. Top the enchiladas with the soup mixture you set aside and sprinkle with the remaining cheese.

Bake for 40 minutes or until the enchiladas are hot and bubbling and the cheese is lightly browned. Top with the remaining diced vegetables and serve. I made homemade Spanish rice to go along with this, but unfortunately that didn’t turn out quite as good as the enchiladas. However, whenever I have that recipe down, I’ll post it here too.

I’d be a terrible person if I didn’t share these: Triple Sin Brownies

Posted on

I need a camera to properly show you the fantastic ooey gooey dark chocolate heaven that are these brownies. Though technically speaking, I don’t believe they can properly be called ‘brownies’ anymore due to the fact that they are no longer brown. They are black. Black as night, black as sin, so dark and delicious are their chocolatey depths. I’ve decided to call them ‘Triple Sin Brownies’ because they inspire gluttony and lust in anyone who tastes them, and envy in anyone who doesn’t get any. Ok, ok, wipe the drool off your chin and I’ll give you the recipe.

You will need:

4 eggs

1 c sugar

1 c brown sugar

1/2 c half and half

8 oz (1 c) butter, melted (that’s two sticks, I use salted sweet cream butter)

1 1/4 c Hershey’s Special Dark cocoa powder

1 3.9 oz box (the really small boxes) Jell-O instant chocolate pudding

2 tsp vanilla

1/2 c flour

1/2 tsp salt

9 in round pan

a little butter and flour

Heat your oven to 300 degrees F. Take an extra stick of butter, not the two you’re gonna use, and smear it all over the inside of the pan. Wipe away any large gobs of butter. Sprinkle in about a teaspoon to a tablespoon of flour. Shake the pan around until the inside is coated with a fine layer of flour. This is to make removing the brownies easier after they’re cooked. Set the pan aside.

Though it is possible to make this recipe completely by hand, using a mixer, either hand or stand-alone, does make it quite a bit easier. Use a small pot to melt the butter in over low heat. In a large bowl, whisk the eggs till they’re light and fluffy. Slowly mix in the sugar, then the brown sugar. Mix in the half and half, then the melted butter. You don’t want to add in the warm butter first, because you’ll cook the eggs. Also, make sure the half and half isn’t straight out of the fridge cold, or you’ll get lumps of solidified butter.

Slowly mix in the pudding powder (no you’re not supposed to make the pudding first) and the cocoa powder. Once the mixture is smooth, add in your vanilla, flour, and salt. Mix until it’s smooth and tempting looking. Fight the urge to eat it at this point. I know it’s difficult, but you’re almost done.

Pour the batter into the prepared pan and yes, use a spatula to get as much out of the bowl as possible. I know that batter looks good but you don’t want thin crispy brownies, do you? Put the pan into the oven and bake for 45-50 minutes, or until a toothpick inserted in the middle comes out clean. I confess, I had to use a bamboo chopstick because I didn’t have any toothpicks, but it worked just the same. While it’s baking, you may lick the bowl, the spatula, the spoon, the beaters, and anything else that may have gotten batter on it. Go on. It’s your kitchen. No one will judge you.

Now the only question is, once the brownies are baked, to share or not to share?

Bachelor Chow! Sausage and Rice

Posted on

When I first talked about starting this blog, I promised a friend I would include some simple dishes for the…culinary challenged, shall we say. Do you live off mostly Ramen? Do you only own a single table setting? Did you just ask “What’s a table setting?” Then this entry is for you, my friends. Short of Ramen, I don’t know a recipe easier than this.

You will need:

Your favorite brand of sausage links

Your favorite brand of barbeque sauce

rice that does not have the word ‘minute’ anywhere on its packaging

dash of salt

small pot

small skillet

measuring cup, both wet and dry

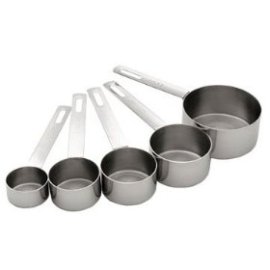
Yes, my dears, there are two types of measuring cups and they are for measuring different things. Wet and dry things measure slightly differently and so you need two different types of measuring cups. The dry measuring cups tend to look something like this:

Image

The wet measuring cups tend to look more like this:

Image

So now that we’ve got that out of the way, lets get to cooking. This is an easy dish to make for one, or many. Just make sure you know how many. I’m going to base this off a single person, just double the recipe for more.

Use the wet measuring cup to measure out two cups of water. Put it in your pot and add just a dash of salt. Set it to high heat until it boils. Once it is boiling, add in a cup of rice, measured with the dry measuring cup. Give it a quick stir, then wait till it boils again. Lower the heat to low-medium and cover with a lid. Cook for twenty minutes.

While the rice is cooking, take a link of sausage and slice it into coins (as opposed to lengthwise). Toss it into the skillet with a few tablespoons of your favorite barbeque sauce and heat it over medium heat. By the time the rice is done, the sausage should be done. You’re basically just warming it through and getting the flavor of the barbeque sauce into it.

Put your rice into a bowl and top it with the sausage. You’re ready to eat in just twenty minutes!

Simple and Hearty: Potato Soup

Posted on

Hands down, my favorite soup in the world is potato. The problem is, I’m picky. I loved Bennigan’s Baked Potato Soup, unfortunately the chain closed down years ago. Since then I’ve found that Carino’s Potato Soup is quite good, however getting a good potato soup at home has been troublesome. I tried a few canned varieties, Campbell’s Chunky Baked Potato Soup being the best contender, but none of them were quite what I was looking for in a potato soup. I wanted something creamy and garlicy but simple. I didn’t want a ton of frills, just potato and warmth and deliciousness. It took me awhile, but finally, I got it right. Oh, and by the way, it’s vegetarian.

You will need:

1 stick plus 2 tbls of butter

3-6 cloves of garlic, minced

1/2 c onion, minced

3 cans vegetable broth

3 lbs potatoes, peeled and chunky diced (make them slightly bigger than bite sized because they’ll cook down a bit)

1 tbls garlic powder, onion powder, garlic salt, black pepper (or to taste)

3 tbls flour (optional if you want a thicker soup)

2 cups half and half

non-stick skillet

large pot

Start by peeling and chunking the potatoes. Set them aside in a bowl of water while you get everything else ready first. In the non-stick skillet, melt two tablespoons butter, then add in your minced garlic and onion. Cook on medium heat until they start to brown and transfer over to the large pot. Add in the vegetable broth and the other stick of butter.

Rinse the potatoes out. If you notice, the water you have the potatoes sitting in should have a slightly cloudy or milky look to it. This is some of the starch leaving the potatoes and rinsing them helps the cooking process a bit. Just give them a swish or two under the faucet and drain them. Add them to the pot and heat on high until the broth starts boiling. At that point, drop the heat down to medium-high, add your seasonings, and continue cooking 20-30 minutes or until the potatoes are fork tender, meaning they fall apart when you poke them with a fork.

Drop the temperature down to low-medium and, if you want your soup to be thick, slowly add in the flour a half-tablespoon at a time, stirring to break up any clumps. Be gentle when you stir at this point or you’ll break up the potatoes. Once the flour is well mixed in, add the half and half. Heat all the way through and serve.

This soup is great by itself, or it could be served in a cup with a bit of shredded cheddar, bacon bits, and chives on top as an alternative to a baked potato.

Super Cheesy: Macaroni and Cheese

Posted on

Growing up, my mom always made sure the house had a few blue boxes of Kraft mac and cheese. However, whenever there was a big family gathering at my grandparent’s house, my grandmother always made macaroni and cheese from scratch. It was the best! To differentiate the two, I always called the blue box “mackie cheese” while the homemade bake was properly called “macaroni and cheese”. Well, unfortunately my grandmother’s recipe for macaroni and cheese is long lost and I had been living off mackie cheese for years. Luckily, my dear friend, whose cooking blog you can see a link to over on the right, gave me a new recipe a few years back. It’s not my grandmother’s macaroni and cheese, but with the tweaks I’ve added, I’ve never gotten any complaints from my family.

You will need:

3 tbls butter (I use salted sweet cream butter)

3 tbls flour

2 c half and half (you can use milk if you want, but where’s the fun in that?)

1 lb cheddar, grated (I prefer using medium, but mild also works, don’t use sharp because it melts too greasy)

1 tsp black pepper or more to taste

2 tsp garlic salt or more to taste

2 c elbow macaroni

2 qt casserole dish

pot for cooking the macaroni in

pot for melting the cheese in

The best method is to start by grating your cheese first. Grate the whole pound, then put it back in the fridge to keep it from melting. Get your oven heating up to 400 degrees Fahrenheit. In a large pot, boil six cups of water with a dash of salt. Once the water is bubbling, put in the elbow macaroni and boil for about five minutes or until the pasta is al dente, meaning it’s still got a slight crunch or chewiness to it. You don’t want to over cook it, or you’ll end up with mushy mac. Once it’s done, drain it and rinse it with cold water. Set it aside.

While the mac is cooking, melt the butter on low to medium in a sauce pan. Whisk in the flour and cook until it starts bubbling. Keep your eye on this and don’t burn it. It shouldn’t get any darker than a light caramel, like a dulce de leche color. Using real stick butter gives the dish an extra kick of flavor, but if you burn it, you just get a burnt flavor through the whole dish. Once it’s ready, slowly whisk in the half and half until all the flour/butter lumps are gone and mixed in. Bump the heat up to medium and add in your garlic salt and pepper.

Now it’s cheese time. Take about three quarters of the pound you grated and slowly add it in, a bit at a time, whisking until everything is smooth. After you’ve added the entire 3/4 pound, make sure it’s fully melted before you do anything else. You really don’t want clumps at this point.

Take your cooked mac and add a bit to the casserole dish. Cover it with some of the cheese sauce mix and stir to make sure everything’s well mixed. Continue this until all the mac and cheese sauce is in the dish and all the mac is well coated in cheese. Top it with the remaining grated cheese. Bake it for 20 minutes or until the top cheese is bubbly and lightly browned. Serve it with your favorite entree, or just eat it by itself. I warn you, it’s rib-sticking and terribly addictive.

Basic Made New: Italian Meatloaf

Posted on

Unfortunately the cameras I have at my disposal are not going to cut it for this blog. I simply couldn’t get good pictures while I was making this to be able to post. So, until I get a better camera, these first posts will be picture-less. Therefore, if I haven’t made my instructions clear, please feel free to ask if you have any questions.

Now, on to the meat. Or should I say, meatloaf? Now, I’ll admit, growing up, I was never a big fan of meatloaf, but I’ve taken my mother’s recipe and tweaked it into two completely different recipes, both of which my family loves. Tonight, I made Italian Meatloaf. Just like any other meatloaf, it’s easy to put together, and you probably have most of the ingredients in your pantry and fridge right now. So let’s get started!

You will need:

1 lb ground beef (I’ve always preferred extra lean)

1 lb ground Italian sausage

2 cups Italian seasoned bread crumbs

1 cup milk

1 egg

1/4 yellow onion, minced

3 cloves garlic, minced

1/2 tsp of the following spices: black pepper, garlic salt, celery salt, ground oregano, ground thyme, garlic powder, onion powder

1 jar (24 oz) of your favorite spaghetti sauce

a bowl for mixing

two loaf pans

To make it, I’m warning you right now you’re going to have to get your hands dirty. I really haven’t found any other way to get it properly mixed up.

First, heat your oven to 350 degrees. Start by adding the ground beef and sausage into the bowl. It helps to go on and mix them together now, and form it into a bowl shape to add all the dry ingredients into. Otherwise, you end up with the problem I had tonight of a whole bunch of breadcrumbs at the bottom of the bowl under everything that don’t want to get mixed up into the meat.

Into that little meat bowl, add in your bread crumbs, your onion, your garlic, your seasonings, and the egg. Fold the meat bowl over and begin kneading everything together. As I said before, I find mixing this together with your hands is the easiest way to make sure everything is well mixed. While you’re kneading everything together, slowly add the cup of milk a bit at a time. I, at least, have a habit of mixing with too much gusto and sloshing things about. Slowly adding the milk prevents that.

Once you’ve got all the ingredients well mixed, split the meat in half in the two loaf pans and form them into loaf shape. Then split the jar of spaghetti sauce between the two loaves, spreading it over the top of the loaves. Then bake at 350 for an hour.

I find this dish works well with buttered noodles and a salad for sides. Hope you enjoy!

Edit: Just a note here, last time I made this, I had an entire second loaf untouched after dinner. So in the interest of simplicity, I simply put a piece of foil over the top and put it in the fridge. Don’t do that. The acidity of the tomatoes in the spaghetti sauce actually ate through parts of the foil. I didn’t know it could do that.